
Affiliate Disclosure: As an Amazon Associate, I earn from qualifying purchases. This means I may receive a commission if you buy through my links, at no extra cost to you.
Is your hammock looking a little worse for wear? Whether it’s dirt, sweat, or that spilled drink from last summer’s backyard BBQ, keeping your hammock clean is essential for both its lifespan and your comfort. At Karenzo Hammocks, we’re passionate about all things hammocking, and we’re here to guide you through the process. If you’ve been wondering how to clean your hammock without ruining it, you’re in the right place. Let’s dive in!
Click the Play button below to listen to our podcast:
Why Cleaning Your Hammock Matters (More Than You Think)
Let’s talk about why you should give your hammock some love. Sure, cleaning it makes it look nicer, but there’s so much more to it than aesthetics. A clean hammock equals better comfort, better health, and an extended lifespan for your favorite relaxation spot.
1. It Keeps You Comfortable
There’s nothing like sinking into a hammock after a long day, but let’s be real—if it’s dirty, stained, or covered in mysterious crumbs, your moment of peace is ruined. Clean hammocks not only look better but feel better, too. You can stretch out without dodging sticky spots or brushing off leaves and twigs.
When your hammock is fresh and clean, it creates the perfect setting for reading a book, listening to music, or just taking a well-deserved nap. Imagine lying back with no distractions—just the gentle sway of the hammock and the sound of the breeze. That’s the dream!
Relatable Moment:
Last summer, I had a picnic with friends, and my hammock became the snack table. By the end of the day, it was covered in chip crumbs and soda spills. Cleaning it afterward made me realize how much better it felt to relax in a clean hammock, not a sticky one.
2. It Protects Your Investment
Hammocks, whether they’re made of sturdy nylon or soft cotton, are an investment. Dirt, grime, and even sunlight exposure can break down the fabric over time. A little maintenance can make your hammock last for years.
Think about it: A hammock is like any other outdoor gear. If you care for it by cleaning and storing it properly, it’ll repay you with countless afternoons of comfort. Neglect it, and you might find yourself replacing it sooner than you’d like.
Pro Tip:
Some high-end hammocks come with UV-resistant coatings, but even these need regular cleaning to keep them in top shape. Dust and debris can wear down protective finishes over time, so don’t skip this step.
3. It’s Better for Your Health
Ever sat in your hammock and felt a sneeze coming on? That might be dust, pollen, or mildew you’re inhaling. Over time, outdoor hammocks can collect allergens and bacteria, especially if they’re stored in damp places.
A clean hammock isn’t just about comfort; it’s about staying healthy, too. For those with allergies or sensitive skin, cleaning your hammock regularly can make a world of difference. Nobody wants to relax in a germ-filled environment, right?
Gather Your Supplies: What You’ll Need
Cleaning a hammock doesn’t require any fancy tools, but having the right supplies on hand can make the process quicker and easier. Before you start, take a moment to gather everything you’ll need.
The Basics
Here’s a breakdown of the essentials:
- Mild detergent: This can be something as simple as dish soap or baby shampoo. If you’re dealing with tougher stains, look for a detergent designed for outdoor fabrics.
- Soft-bristle brush or sponge: A scrub brush can help with stubborn dirt, while a sponge is gentler for more delicate fabrics like cotton.
- Bucket or tub: Big enough to submerge your hammock if needed.
- Garden hose or sink: For rinsing off soap and grime.
- Towels: You’ll need these for blotting and drying your hammock.
- Mesh laundry bag: If your hammock is machine washable, this will keep it from tangling.
Optional Extras
Want to go the extra mile? Consider these additional supplies:
- Vinegar: Great for tackling mold or mildew naturally.
- Fabric protectant spray: Once your hammock is clean and dry, this can add a layer of protection against future stains.
- Rubber gloves: If you’re working with particularly grimy hammocks, gloves can save your hands from a mess.
Pro Tip:
Always check your hammock’s care instructions. Some fabrics, like nylon, are more forgiving, while others, like cotton or woven materials, require a gentler approach.
Shake, Spot Clean, or Deep Clean? Here’s How to Decide
Not all cleaning jobs are created equal. Depending on how dirty your hammock is, you might just need a quick shake, a targeted spot clean, or a full-on deep clean.
Step 1: Shake It Out
This is the easiest step but also one of the most important. Even if your hammock looks clean, it probably has hidden dirt, leaves, or even bugs stuck in its folds.
- Take it down: Detach your hammock from its stand or tree straps.
- Give it a good shake: Hold one end firmly and shake out all the loose debris. Don’t be afraid to get vigorous—this is your chance to dislodge anything stuck.
- Inspect it: After shaking, take a close look for stains, spots, or stubborn debris that might need extra attention.
Pro Tip:
If your hammock has wooden spreader bars, make sure to inspect between the bars and fabric folds. Dirt loves to hide there!
Step 2: Spot Cleaning for Small Stains
Spot cleaning is your best friend when dealing with localized stains. This method is quick, efficient, and perfect for those “oops” moments.
How to Spot Clean:
- Mix a cleaning solution: Combine a few drops of mild detergent with warm water in a small bowl.
- Apply gently: Dip a soft sponge or cloth into the solution and dab it onto the stained area. Avoid scrubbing too hard, especially if the fabric is delicate.
- Rinse & dry: Use clean water to rinse away soap residue, then blot with a towel to absorb excess moisture.
Relatable Moment:
One time, my hammock fell victim to a dripping ice cream cone. Spot cleaning saved the day—and my hammock didn’t hold a grudge.

Step 3: Decide If It’s Time for a Deep Clean
If spot cleaning doesn’t cut it, or if your hammock hasn’t been cleaned in a while, it’s time for a full wash. A deep clean can bring even the dirtiest hammocks back to life, so don’t be afraid to get your hands wet.
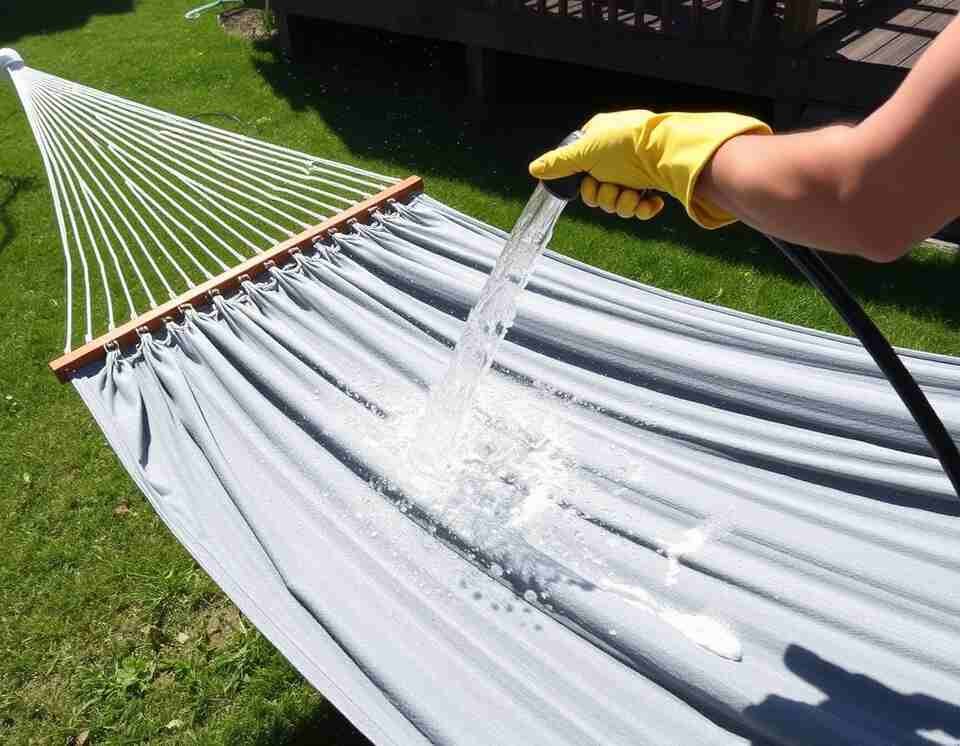
How to Hand-Wash Your Hammock
Hand-washing is the most thorough way to clean your hammock while being gentle on the fabric.
Step-by-Step Instructions:
- Prepare the washing area: Use a bathtub, large sink, or outdoor tub. If you’re working outside, a kiddie pool can be a fun and practical option!
- Mix your solution: Fill the tub with warm water and add a few capfuls of mild detergent. Swish the water around to create some suds.
- Soak your hammock: Submerge the hammock and let it soak for 20–30 minutes. This loosens dirt and grime without the need for harsh scrubbing.
- Scrub gently: Use your sponge or brush to work on stubborn stains. Focus on areas like the middle of the hammock (where most of the dirt accumulates) and the edges.
- Rinse thoroughly: Empty the soapy water and refill the tub with clean water to rinse. Repeat as needed until no soap residue remains.
Watch our YouTube video on how to clean a hammock—easy steps with a friendly, relaxed vibe to make cleaning as carefree as lounging!
How to Machine-Wash Your Hammock (If It’s Safe to Do So)
Machine-washing your hammock can save time and effort, but it’s not for every type of hammock. Always check the manufacturer’s care instructions first. Hammocks made from delicate materials like cotton or handwoven designs might need to stick to hand-washing. However, durable nylon or polyester hammocks are often machine-friendly.
Step-by-Step Machine Washing
1. Prep Your Hammock
Before you toss your hammock into the washing machine, give it a good shake. You don’t want leaves, sand, or crumbs clogging up your washer. If the hammock has wooden spreader bars or metal parts, remove them first. For hammocks with ropes or straps attached, use a mesh laundry bag to keep everything from tangling.
2. Choose the Right Detergent
Opt for a mild, gentle detergent—something free of harsh chemicals or bleach. Bleach might seem like a good idea for tough stains, but it can weaken the fibers and fade colors over time. Baby detergents or ones labeled for delicate fabrics work well.
3. Set the Washer
Use the gentle or delicate cycle with cold water. Hot water can shrink some fabrics or damage synthetic ones. If your washer has an option for an extra rinse cycle, use it to ensure no detergent residue lingers.
4. Skip the Fabric Softener
While it might sound nice to add fabric softener, avoid it at all costs. It can coat the hammock’s fibers and reduce their breathability. Hammocks, especially outdoor ones, rely on breathable materials for comfort and durability.
5. Dry with Care
Once the washing is done, resist the urge to throw your hammock into the dryer. The heat can warp or weaken the fibers, even on low settings. Instead, follow the drying steps below to air-dry your hammock safely.
Real-Life Note:
I once thought I’d save time by using the dryer. Big mistake! My hammock came out smaller and misshapen. Since then, I always air-dry it—it takes longer but keeps it in perfect shape.
Drying Your Hammock: Air-Drying vs. Quick Hacks
Drying your hammock properly is just as important as cleaning it. Wet hammocks can grow mildew or smell musty if not dried thoroughly. Luckily, drying a hammock is simple and doesn’t take much effort—just a bit of patience.
The Best Option: Air-Drying
Air-drying is the safest way to ensure your hammock dries completely without any damage.
1. Find the Right Spot
Choose a sunny, breezy area. If you’re drying outdoors, hang your hammock between two trees, a sturdy railing, or even on your hammock stand. Indoors, you can use a shower rod or a drying rack, but make sure there’s good ventilation.
2. Spread It Out
Lay the hammock flat or let it hang loose. Make sure no parts are bunched up, as this can trap moisture and slow the drying process.
3. Rotate Occasionally
If you’re air-drying in a shaded spot, flip or rotate the hammock every few hours to ensure all sides dry evenly.

Quick Drying Hacks
Need your hammock dry faster? Here are a couple of tricks:
- Towel Blotting: Lay a clean, dry towel over the hammock and press down to absorb excess water. You can even roll the hammock inside the towel and gently squeeze.
- Fan or Hair Dryer: Use a fan to circulate air or a hair dryer on the cool setting to speed up the drying process. Avoid using heat, as it can damage the fibers.
Real-Life Tip:
Once, after an impromptu beach trip, my hammock was soaked, and the sun was setting. I used towel blotting and a portable fan to dry it overnight—it worked like a charm!
Storing Your Hammock the Right Way
Proper storage is the unsung hero of hammock maintenance. Even if you clean and dry your hammock perfectly, storing it incorrectly can lead to problems like mold, mildew, or fabric wear.
Step-by-Step Storage Guide
1. Make Sure It’s Completely Dry
Before storing your hammock, double-check that it’s 100% dry. Even a small amount of moisture can lead to mildew growth, which is tough to remove and smells terrible.
2. Choose a Storage Bag or Box
Many hammocks come with their own storage bags. If yours didn’t, a breathable cotton or mesh bag works well. Avoid plastic bags—they can trap moisture and create a breeding ground for mold.
For long-term storage, consider using a plastic bin with a tight lid to keep pests out. Line the bottom with silica gel packets to absorb any moisture.
3. Store in a Cool, Dry Place
Your hammock’s new home should be free from humidity and extreme temperatures. Basements, garages, or outdoor sheds might seem convenient, but they’re often damp. Instead, store your hammock in a closet, under a bed, or in a storage bench.
4. Avoid Direct Sunlight
Even when stored, prolonged exposure to sunlight can fade colors and weaken the fabric over time. Keep your hammock in a shaded or indoor spot when not in use.

How to Store Accessories
If your hammock has accessories like tree straps, carabiners, or a stand, store them alongside the hammock so everything’s ready to go when you want to set it up again. Clean and dry these items before storage, too—straps and carabiners can accumulate dirt and rust if neglected.
Relatable Moment:
I once stored my hammock in a closet without realizing the floor was slightly damp from a water leak. When I pulled it out a month later, the mildew smell hit me hard. Lesson learned: Always double-check your storage spot!
Bonus Tips for Special Hammocks
Not all hammocks are created equal, and some require extra care depending on their material or design. Here are tips for specific types of hammocks:
1. Rope Hammocks
Rope hammocks, especially those made of cotton, are prone to fraying and mildew. Use a soft brush to clean between the ropes and let them dry completely. A diluted bleach solution can help remove stubborn mildew stains, but test a small area first to avoid discoloration.
2. Camping Hammocks
Made from lightweight nylon or polyester, camping hammocks are often treated to resist water and UV damage. These can usually be spot cleaned or machine washed. If you’re out in the wild, a quick wipe-down with a damp cloth can keep your hammock fresh between deeper cleans.
3. Quilted Hammocks
These luxurious hammocks have a layer of padding between two fabric sheets, making them extra comfy but trickier to clean. Avoid soaking them completely—spot clean with a damp cloth and mild detergent, then air-dry thoroughly.
4. Handwoven or Decorative Hammocks
These artisanal hammocks are often delicate, so hand-washing is a must. Use cold water and avoid scrubbing too hard. Let them air-dry in a flat position to prevent stretching.
5. Hammocks Made from Recycled Plastic Bottles (PET)
These hammocks are often durable and water-resistant. Clean them with a gentle soap solution and a soft brush or cloth. Avoid using harsh chemicals, as they can degrade the recycled material over time.
6. Hammocks Made from Upcycled Denim
Denim hammocks can handle gentle hand washing with cold water and a mild detergent. Be cautious about scrubbing too hard, as this can weaken the fibers or fade the color. Lay flat to dry to avoid stretching.
Pro Tip:
If you’re ever unsure about how to clean a specific type of hammock, look up the manufacturer’s care instructions online. It’s better to be safe than sorry!
Conclusion: Relax in a Clean Hammock
Cleaning your hammock might feel like a chore, but it’s worth every minute. Whether it’s a quick shake, a spot clean, or a full-on soak, regular maintenance ensures that your hammock stays comfortable, safe, and ready for every adventure.
At Karenzo Hammocks, we’re all about helping you get the most out of your hammocking experience. With a little care, your hammock can become your favorite spot to unwind for years to come. So go ahead—clean it up, hang it up, and relax like you mean it!
Images created using PicLumen.
